Showing posts with label DIY. Show all posts

Wednesday, February 25, 2015

our next remodel project

you might remember that my hubby and i are pretty handy when it comes to DIY projects....and that we did some pretty incredible makeovers at our old home. (remember THAT bathroom?!?)  

since moving to our current home, our projects have dwindled significantly and i think the primary factor has been time.  in fact, that is the only explanation that i can find for the fact that my upstairs bathroom was still carpeted until last weekend.  carpet?  in a bathroom?  where two toddlers go potty?  
um, not anymore.

we pulled it up and started one of our largest remodel projects to date (actually, it may be somewhat of a tossup against the basement remodel at 212 S. Hazel - from this to this).


luckily, the bathroom is a pretty large room, but the current layout doesn't do it any favors.  we plan to rearrange the fixtures, and add a washer and dryer so i can have laundry on the same floor as the bedrooms (rather than in the basement - which is two flights of stairs down)


doing projects is so much more complicated with kiddos, but they are also super awesome helpers!


after we pulled back the carpet, we found not just one, but two layers of unsightly linoleum underneath.  the demo process took a good full day of effort.....


and when we finally got down to the subfloor we were pleasantly surprised with a decent layer of wood.  it is possible that we will salvage it - at least on the laundry room side.....


we also plan to keep the claw foot tub, though we want to move it to the corner of the room.


so i didn't realize that by jumping into this project we were going to have to turn the water off and stop using it.....but that is where we are at right now.  project standstill.


i am super excited about our plans however, and am excited to get started on rebuilding. 


stay tuned....

Wednesday, August 14, 2013

new house tour {blaire's room}

Are you ready for a little peak inside my new house??  Come check out the nursery! 


I am really happy with the way my little Blaire's room turned out!  I was wanting something sweet and girly as I had a shared, gender neutral nursery before; but I didn't want to get too crazy with the budget since she is growing like a weed and won't most likely be in her crib all that much longer.  Something that would easily grow into her big girl bedroom was a must!

My mom crafted these adorable wooden letters to help her old nursery seem a bit more girly, and I love how well they work in her new room as well!


Fortunately, the previous owners of our home had really good taste, along with both a daughter and a son like us, so the paint colors in the entire upstairs have stayed the way they left them! Blaire's walls are mostly an aqua blue color with one accent wall a lime green.  This worked perfectly as my previous color scheme was green and I had all white furniture.  I brought that along and found ways to add pink for a girly pop!


Do you remember that pinterest project I made to hold Blaire's bows?  I think it makes a fantastic fashion statement as a piece of wall art in her room.....if only it came close to holding half her bows..... ;)


This aqua mirror is something I picked up at a thrift shop long ago (before I even had Blaire) to use in a photoshoot and I thought it worked perfectly with her color scheme.  My hubby convinced me to hang it low, at a toddler level so she can actually use it.  Someday I think it would work well above a little dresser to be an eclectic vanity.


To give myself a ton of flexibility, I ordered simple pink sheer curtains, and bought paper lanterns from hobby lobby to hang above her crib for three dimensional interest. Yes, I did want a sweet crystal chandelier (the $200 one from pottery barn), but that isn't in my current budget. I think the lanterns will do for now ;)


Some simple bedding accessories may have been my biggest splurge for the room, but this sweet personalized pillowcase from pottery barn kids will be a great accent piece for whatever bed she grows into, and since she is past the need for bumpers, I thought a really trendy patterned fitted sheet was a great way to spruce up the corner of the room her crib is in ;). Not sure how much longer chevron will be all the rage, but I think it is stinkin adorable!!


This whole carpet thing is pretty new to me as our old house was exclusively wood floors.  I try to protect patches with area rugs, but it seems impossible to keep such light colored carpet clean with a messy eating, crawling babe. Solutions??!


Lastly, my good friend, sarah dorn of mama peacock, created this awesome decorative piece that goes just perfectly in her room.  It is made from an old window and I adore the rustic, shabby chic feel it adds to her room!  There is something very feminine about it to me ;)


That's all for now!  Very girly and very pink.  I'm kind of jealous of her room, folks! Lol

Thursday, August 1, 2013

rustic dining {diy furniture}

okay, so those of you who have been following our family story know that we moved to a new house a little over a month ago.  since then we have been trying to get unpacked and settled and make our new home feel like a cozy space.

the dining room is significantly larger than the one in our old home, and we felt that our dining room table and chairs set was kind of lost in the room.  after browsing around at new sets which cost way more than we wanted to spend with none of them achieving the look and overall feel we wanted, we decided to make our own.

why not?

we are ultimate do-it-yourselfers, and why should that change just because we have a new home?!?

so, i proudly present to you, our new dining room table and chairs set.

courtesy of my hubby's hard work,

and the combinations of our imaginations.


i like to think of it as rustic meets modern, which seems perfectly in place in our old, very traditional home ;)


the top surface is a rescued barn door (thanks to my dear friend for helping rescue it from the family farm down the street from her)


it got sanded down real good, with a nice thick top layer of epoxy to give it a smooth surface and shine.


the legs are sawhorses.  metal ones.  
oh and did i mention that they are yellow?  

they provide a very nice little color pop in the room.


we ordered the chairs online, and while the two end chairs are a bit of a luxurious shell chair - nice and roomy and comfy; 


the middle chairs are very minimal and sleek which helps us fit 10 chairs around it, with an additional two to add to the ends when we need to seat a large crowd.


i am so thrilled with how it turned out.

i am so glad that my hubby is game for trying my crazy ideas, and that he actually has the expertise to make it happen and make it happen the way i envisioned it.


we are ready for a dinner party....

come on over!


Monday, March 18, 2013

two is better than one


i love this sweet sibling moment.

hendrix is so proud of these shirts we made, in fact he wants to wear his every.single.day.

love him.
love her.

they are the best!


Saturday, February 23, 2013

pinteresting for mommy

since we all know that i take a million photos, i bet you are wondering what i do with all of them?  

me too!  

my normal routine is to get them uploaded to my computer (with backups on my external hard drive, and an online share location) sorted by month taken, and post my favorites to facebook.
occasionally when i get really inspired i gather up a collection that seem to go together and print a photobook.

and once in a very great while, i print some larger photos to hang on my walls. 


i was recently inspired by a pinterest idea to create an entire gallery wall of my favorite photos, and i actually followed through with it!

i have done pinterest projects for my baby, and for my toddler in the past; but i seldom find or make the time to do a project that is really 
just. 
for. 
me.  

this was simple. inexpensive. and cool.


so first off, we bought 16 quare record frames from michaels (they come in 3-packs, and were on sale for $9.99.....an affordable way to buy that many frames!)  they are simple and clean.  i like that as they allow the photo to stand out more. besides when you put that many of them on the wall, they are bold enough without having thick, dark frames. 


i bought a matte cutter, and matte in bulk.  also very inexpensive, though a bit time consuming to cut. 

i ordered some of my favorite photos in a size 8x10 and cropped them to fit into square openings in the frames.


i love the end result as my walls are now full of current, candid & meaningful photos of my two favorite subjects.  

we didn't have one wall large enough, so there are little groupings of them spread out in between the windows on the whole north side of my main floor.  


and let's see...

while i am talking about pinterest projects, i also recently turned a goodwill purchased picture frame......


into an adorable headband and bow holder for miss blaire.  i saw the original idea here


oh how much i love pinterest! 


Monday, June 25, 2012

22 weeks


baby girl is growing and growing.  

at 11 inches long and weighing in at roughly 1 pound, she is about the size of a spaghetti squash.  which actually sounds, kind of yummy right now........everything sounds yummy to me right now.  my appetite is massive.  i actually sometimes eat 5 square meals a day.  really. truly.

can you tell from this belly?!?


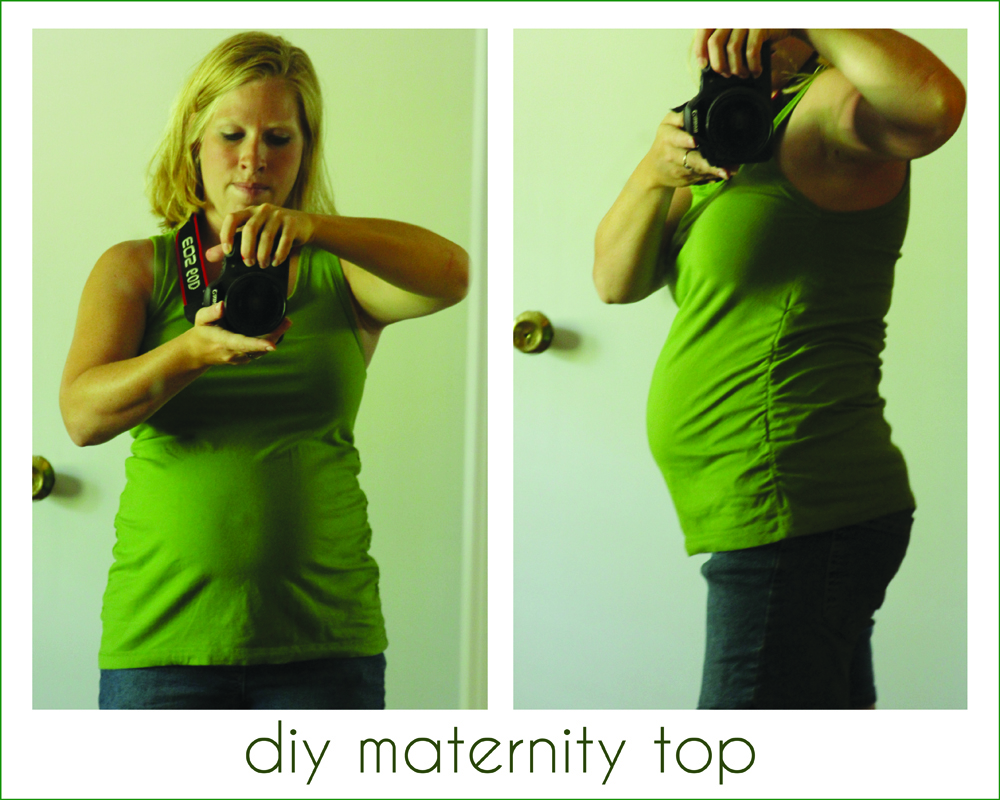
i did my first pinterest project for ME, after pinteresting for both hendrix and blaire at my last two pinterest nights, and am proud to show of this cute top that i transformed.  


i got my inspiration from this pin, and i picked up a couple oversized tank tops from good will to try it out.  i needed to buy a couple sizes larger than i normally wear, so that the shirts would be plenty long (i have found that even some of my maternity tops don't seem to be long enough....) which did require me to take in some extra fabric under the arm holes, but that was pretty simple.  

overall i am pleased with how cute and easy this project was for the investment of $1.49 per shirt. ;)

if this hot weather continues (90+ degrees) than tank tops and shorts are all i will need in my wardrobe this summer!