Showing posts with label pinterest. Show all posts

Wednesday, January 8, 2014

our homemade ornament tradition continues


we strayed a tad bit from our norm this year with our homemade holiday ornaments.
while they were all glass balls that we decorated with burlap, lace, twine and ribbon; each one was made unique.


this was a really fun family project, as my 3 year old enjoyed snipping the various cloths and stuffing them inside the balls.  daddy was a big fan of winding and wrapping on the outside, and i did lots of bow tying and label printing.


overall, i am very pleased with the finished product, and absolutely love the shabby-chic feel that they add to my christmas tree.  i kept three (so that we have a family one, and both hendrix and blaire will be able to have one of their own for their future tree someday.)


it seems like the number of ornaments that we make has grown each year....and with the fall being such a busy time of year for my photography business, it was imperative that we make an ornament that was relatively simple.

i think in this case, however, simple is nice ;)


for more crafty inspiration, check out our past baumgartner family ornaments!


i absolutely love placing all the hand-made ornaments on my tree every year (both those that we have made, and those that have been made by our friends and family) and reflecting on all the fond memories associated with them.  

we have much to be thankful for!

Saturday, February 23, 2013

pinteresting for mommy

since we all know that i take a million photos, i bet you are wondering what i do with all of them?  

me too!  

my normal routine is to get them uploaded to my computer (with backups on my external hard drive, and an online share location) sorted by month taken, and post my favorites to facebook.
occasionally when i get really inspired i gather up a collection that seem to go together and print a photobook.

and once in a very great while, i print some larger photos to hang on my walls. 


i was recently inspired by a pinterest idea to create an entire gallery wall of my favorite photos, and i actually followed through with it!

i have done pinterest projects for my baby, and for my toddler in the past; but i seldom find or make the time to do a project that is really 
just. 
for. 
me.  

this was simple. inexpensive. and cool.


so first off, we bought 16 quare record frames from michaels (they come in 3-packs, and were on sale for $9.99.....an affordable way to buy that many frames!)  they are simple and clean.  i like that as they allow the photo to stand out more. besides when you put that many of them on the wall, they are bold enough without having thick, dark frames. 


i bought a matte cutter, and matte in bulk.  also very inexpensive, though a bit time consuming to cut. 

i ordered some of my favorite photos in a size 8x10 and cropped them to fit into square openings in the frames.


i love the end result as my walls are now full of current, candid & meaningful photos of my two favorite subjects.  

we didn't have one wall large enough, so there are little groupings of them spread out in between the windows on the whole north side of my main floor.  


and let's see...

while i am talking about pinterest projects, i also recently turned a goodwill purchased picture frame......


into an adorable headband and bow holder for miss blaire.  i saw the original idea here. 


oh how much i love pinterest! 


Monday, June 25, 2012

22 weeks


baby girl is growing and growing.  

at 11 inches long and weighing in at roughly 1 pound, she is about the size of a spaghetti squash.  which actually sounds, kind of yummy right now........everything sounds yummy to me right now.  my appetite is massive.  i actually sometimes eat 5 square meals a day.  really. truly.

can you tell from this belly?!?


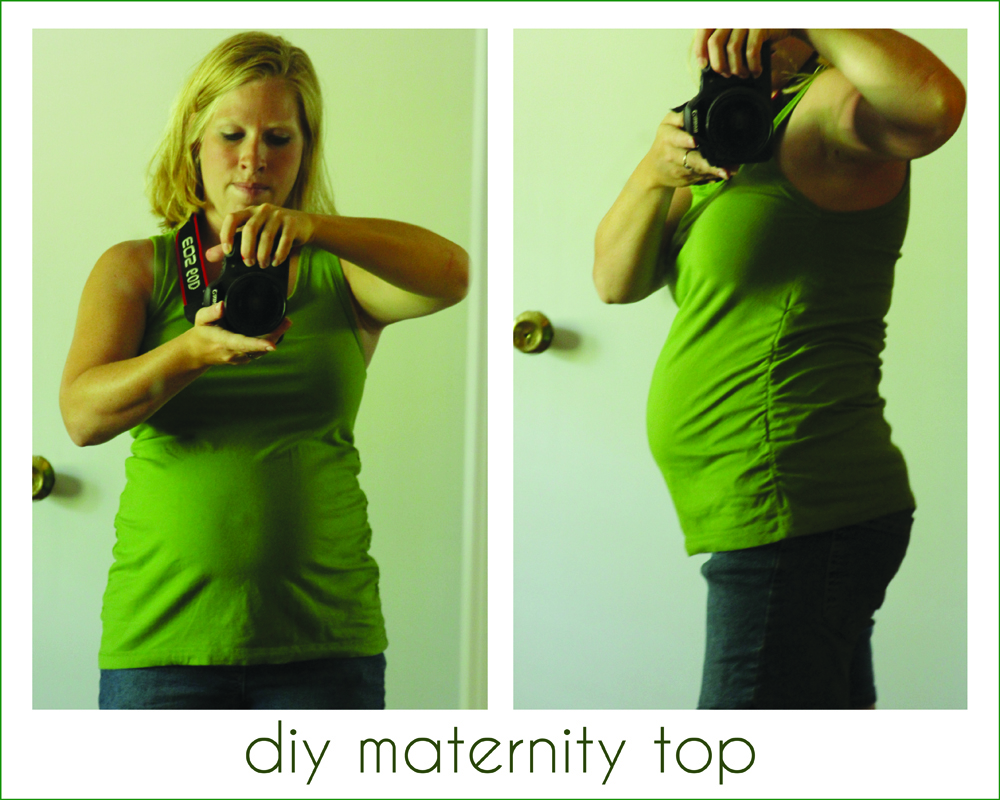
i did my first pinterest project for ME, after pinteresting for both hendrix and blaire at my last two pinterest nights, and am proud to show of this cute top that i transformed.  


i got my inspiration from this pin, and i picked up a couple oversized tank tops from good will to try it out.  i needed to buy a couple sizes larger than i normally wear, so that the shirts would be plenty long (i have found that even some of my maternity tops don't seem to be long enough....) which did require me to take in some extra fabric under the arm holes, but that was pretty simple.  

overall i am pleased with how cute and easy this project was for the investment of $1.49 per shirt. ;)

if this hot weather continues (90+ degrees) than tank tops and shorts are all i will need in my wardrobe this summer!  


Monday, May 7, 2012

pinteresting for toddler

after crafting something for baby baum #2 at my last pinterest party, i felt compelled to create something that was specifically for hendrix this month.

with our basement remodel nearing completion, it was easy to find a project that would be fun and useful for his new playroom.

i opted for alphabet magnets.

i had seen many different sets on both pinterest and etsy that caught my eye, but i decided to pool all the ideas and come up with a hybrid design that would match perfectly in our space.


i am very proud of my end result! and i think they look perfect in the playroom!


this project was relatively simple and not very expensive.  i bought the alphabet chipboard letters (which i spray painted white with paint i already had) from hobby lobby for $2.99, the roll of magnet (which i barely used half of) for $4.99 and my first ever bottle of mod podge.  
yes, folks, this was my first mod-podging project and i think i am 
hooked.  for.  life.  
i am so glad that i bought the bigger bottle of it, which was $7.99, but i barely used any of it.  it will last for many projects to come.  ;)  

oh goodie!


so to prepare for pinterest night, i got the chipboard pieces all spray painted.


then i picked out some scrapbook papers that match with our basement color scheme.

and lastly i tried out one of the letters on a scrap piece of wood leftover from the custom bookshelves we built in the basement.  i wanted to double check the size that i wanted before i asked hubby to cut me 26 of them. ;)


so i applied the paper with mod podge - i put a layer both under and over the paper.  it goes on like paint, but dries clear like glue.  
it is the coolest stuff ever.  
it leaves a nice ridge on the surface that gives everything almost a canvas-like texture.  so great.  oh and it dries really quickly.  
then i also applied the letter with mod podge.  i did a couple coats here to make sure that the letter would lay nice and flat as it dried.


after a quick demonstration on the metal panel, i concluded that they would work fine, asked my hubby to cut me a ton of them, and loaded my supplies into a box for pinterest night!


here is my project spread out on the ping-pong craft table (which works perfectly might I add, as it is a great height for projects), and i have no idea why i had the letters lined up backwards.  seriously.  i didn't even realize this until i was all done and took this picture.  


i love this custom set of letters, and am thinking i might have to expand it with a set of numbers next. ;)


Thursday, April 19, 2012

pinteresting for baby

so last weekend i went to a pinterest party.  it was a lot of fun.  several ladies just got together and brought the supplies needed to make a craft project that had been seen on pinterest.  it was the perfect opportunity to actually make a project that i had always had good intentions of working on someday.....


now that i am pregnant again, i have found myself being drawn to baby-related pins more than others.  i had been eyeing several pins with tutorials on jazzing up some plain white baby onesies.  i had a pile of onesies that hendrix barely wore, so i thought i would give it a try!

i liked the sweet ties, but was really a sucker for the fabric flowers and ruffled buns!  
why not make some of each?


i also happened to have some scraps of fabric that all coordinated with each other, leftover from my last pinterest project.  i made the flag banner to use as a photo prop, and thought that having some coordinating little outfits for babies would be an awesome start to a really great photo ;)  

with a $0 project cost because i used all supplies that i already had, i accomplished 4 little onesies in an evening of fellowship with some girlfriends.  i think that is a great success!


and now i am prepared with something sweet and cute whether i have another little boy....


or a sweet lil girl ;)


linking up with: