So Hendrix's first encounter with solid foods was boxed rice and oatmeal cereals from the grocery store. We spent the extra couple bucks to buy organic, and felt pretty good about what we were feeding him.

Next he started eating some vegetables. These were all steamed by me from fresh and then pureed and frozen into portion sized ice cube trays (this makes loading his diaper bag for the day very easy as I just throw a few cubes in a few bowls with lids). He took a particular liking to squash and sweet potatoes, and was not a huge fan of peas or green beans.
Then we moved on to fruits. He really loved the apples and pears, but refuses still both bananas and avocados. I bought him some baby yogurt to try, which he loved, but when I read that sugar was one of the ingredients I questioned whether it was really a good choice for such young and impressionable taste-buds.
As I was starting to research when he could be allowed to try various new foods, and planning my next big baby food making day, I spoke with a fellow mom friend who passed along her tips in the form of a book that she let me borrow. She prefaced the loan by telling me that this book has some pretty radical ideas on what to feed your baby, but the tips about fruits and vegetables were especially helpful for her.
Being the enthusiastic mom that I am, I read the book, Super Baby Food, rather thoroughly and decided to try some of those crazy ideas.
Homemade Yogurt
Like I already mentioned, Hendrix really likes yogurt, so i thought it was worth a shot. It seemed easy enough.
All that is needed is; milk, a thermometer and a bacterial culture source.

First you scald the milk to kill the bacteria. You can use any kind of milk to make yogurt, but whole milk is what is best for little guys so that is what I used. The recipe said to use a quart (4 cups) of milk, and that using a stainless steel or glass pan would be best for not affecting the taste.

Scalding means to heat until almost boiling which is when small bubbles form around the edges, this occurs around 180 degrees and I used my candy thermometer to ensure that it got hot enough (as recommended by the author).

Once it reaches the target temperature you should remove it from the heat and let it cool down to the incubation temperature. Apparently the perfect temperature for the bacteria to grow is 112 degrees, but it really just needs to be somewhere in between 90 and 120 degrees. I let mine cool on the counter and kept checking the temp on my thermometer. It took about an hour.

Next you add the "starter" or friendly bacterial culture. One way you can do this is by adding store-bought yogurt (2 tablespoons to each quart of milk), another way is by adding freeze-dried bacterial culture from a natural foods store (sold like yeast), or eventually using some of your homemade batch for the next batch. If you use store-bought (which is what I did), just make sure that you use plain yogurt, and that it says on the label that it contains live and active cultures.
The yogurt that you add should be room temperature so it doesn't drastically change the temperature of your milk as you stir it in.

Lastly, you just cover it and let it incubate for 4-12 hours until it thickens to the consistency of yogurt. I set mine in a water bath in my crockpot on the warm setting overnight and it was ready in the morning.
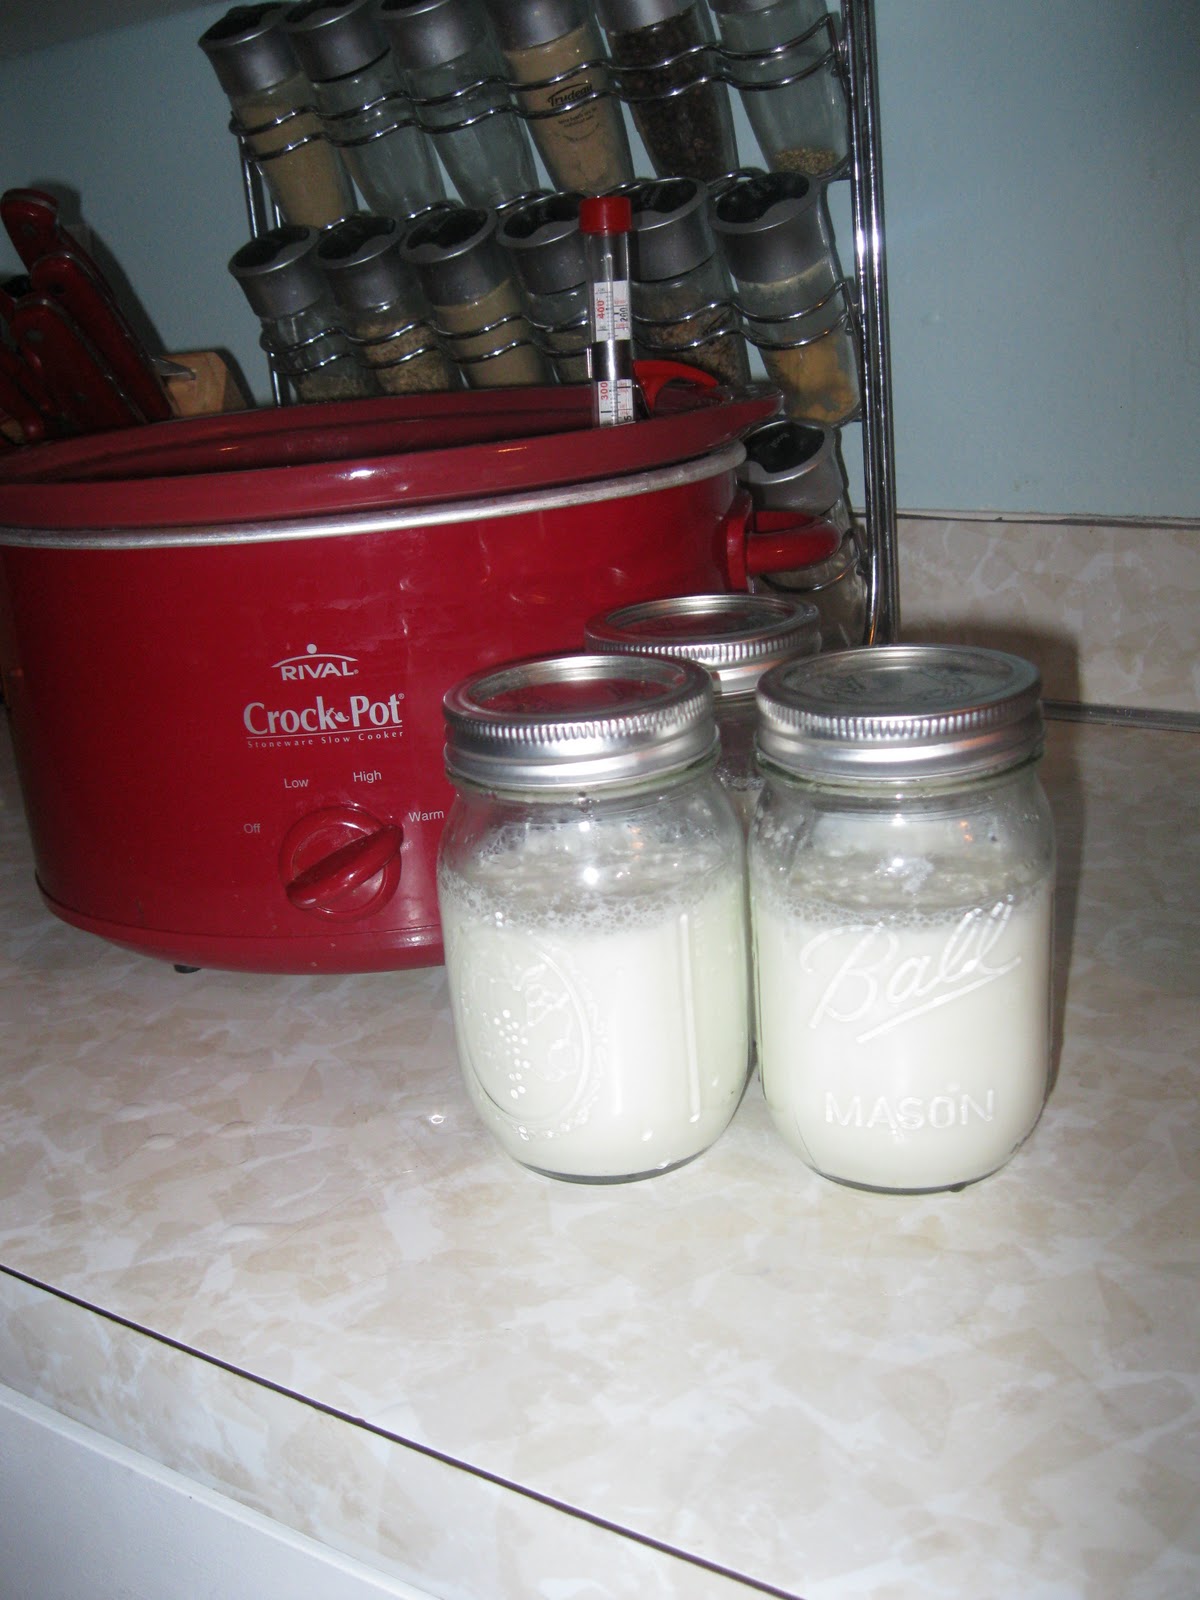
It was a bit tart and was not sweet at all. I don't think that it tastes very yummy all by itself (but then again I am used to the sweet, fruity yogurt that I usually buy at the store), but when I mixed it with some peaches it was pretty good. Hendrix really likes it and that is what matters!
Rice Cereal
While I was waiting for my yogurt to incubate I decided to whip up some cereal. The book also discusses the health benefits of feeding your children super porridge, and recommends a cereal made with a variety of whole and natural grains.
Just like with other baby foods, it warns to introduce the grains individually before mixing them together to ensure that your child doesn't have an allergic reaction. They recommend starting with brown rice, and then moving on to steel cut oats, millet, barley, etc.

I blended 1 cup of rice in my blender for two minutes until it turned into a very fine powder.

I added it to 4 cups of boiling water, stirring it in with a whisk, and then simmered it for 10 minutes.

That made two dozen mini-muffin sized portions that I put in the freezer covered with saran wrap. My freezer is really filling up with food for my little man....

Wonder how long this will last?


Look at you momma!! Way to go! I never really read up on the yogurt because I thought they weren't supposed ti have dairy for a while. Will look into it ;o) However, I did bookmark this little diddy http://crockpot365.blogspot.com/2008/10/you-can-make-yogurt-in-your-crockpot.html
ReplyDeleteMaybe try mixing in some avocado or banana into the yogurt & see if he takes to them a bit better
Isn't it so much fun feeding them ;o)